
At CovertSwarm we pride ourselves on being able to provide the Offensive Operations Center as a centralized platform for managing and identifying risk to your organization.
Following on from our recent blog post on why web application security and why it is important. One of the many new features we have recently implemented is the ability for our users to execute discovery and vulnerability scans against their application stack.
This blog post will provide an insight into how the web application discovery and vulnerability scanning works, and will talk a little bit about the difficulties faced as a development challenge.
What does the web application scanner do?
The Web Application Scan feature is one of our Automated Reconnaissance tools that allows users to schedule recurring scans against their application assets.
The purpose of this tool is to discover more about the targeted assets through spidering of the web pages and the configuration of the applications, but also to enumerate and report on any vulnerabilities that may be present at the time of the scan.
Some examples of the potential findings that can be identified from the web application vulnerability scanner include:
- HTTP security headers (Strict-Transport-Security, Content-Security-Policy, etc.)
- SQL Injection
- Cross-Site-Scripting (XSS), reflected, persistent, and DOM-based
- Buffer overflows
- Etc.
Creating a web application scan
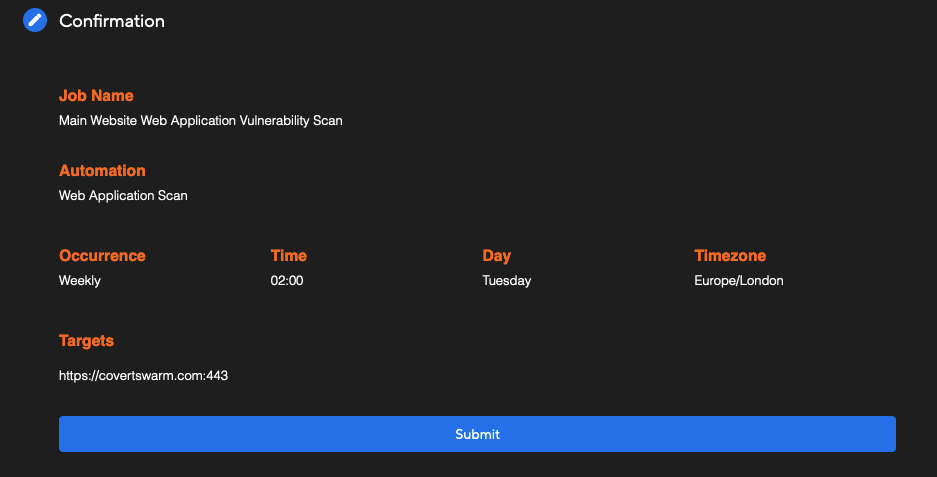
Setting up a scan is simple.  You’ll need to create a new scheduled job via the Automated Reconnaissance page.
Initial Setup
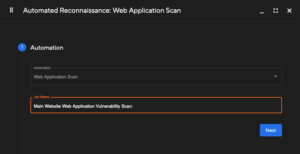 From here, select the automation type and provide a friendly name for the scan to differentiate from other scans that may have been created.
Target Selection
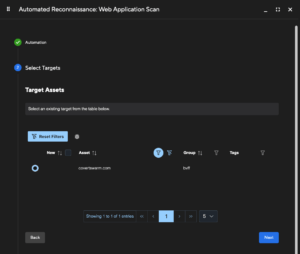 Next, select a target for the scan.
Due to the potential length of time a scan can take only one target per scan can be configured, but multiple ports per target can be set later in the configuration section.
You can change the target at any time in the future after the scan has been initially set up. Multiple scans for different target assets can be configured as required.
Configuration
The configuration section is next, which is used to affect how the scan performs both in terms of scan ‘speed’ and level of depth. Here the scan type of ‘Passive’ or ‘Active’ can also be selected.
Target Port Selection
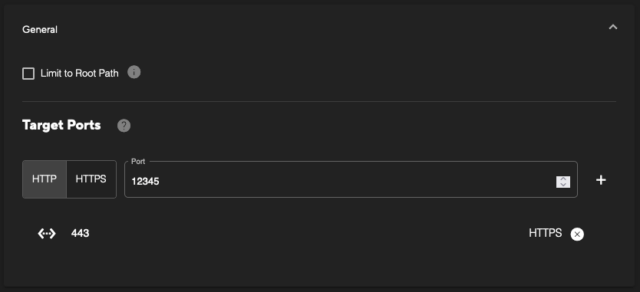 Firstly, within the ‘General’ section, there is option for limiting the scan to only target the root path (‘/’). This can be useful in situations where a ‘Passive’ scan is selected, and basic vulnerability and enumeration checks will be performed. For example, to only identify insecure header configurations for the base page.
Additionally, this section allows for the selection of the target ports for the selected asset. Multiple ports can be provided if there are web services that run across different ports. When you click into the port input field the list will pre-populate with any known web services by the OOC.
Ensure you select whether the service is HTTP or HTTPS if you are inserting a new target port.
Spidering / Web Crawling
Next is the ‘Spidering’ section. The configuration options here will default to a reasonably fast scan but can be further adjusted as needed for each application. The two options here are:
- AJAX spidering: This can be enabled to identify new paths or routes within dynamic JavaScript. Enabling this can take additional time for the scan to run, but can also return a much greater level of coverage.
- Maximum Spider Depth: By default, this is set to 3 Levels, which would perform discovery and recursive crawling via the spider to three levels of the URL path. This can be raised to a maximum of 10, but an increase in the depth can lead to longer scan times.
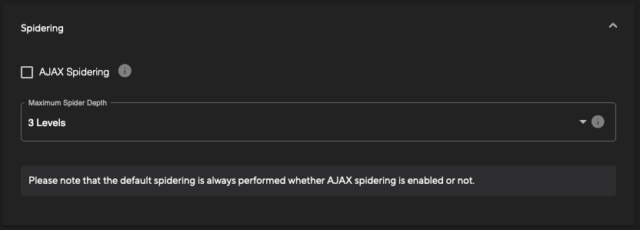 The basic page crawling via spidering is always enabled to enable the discovery of pages for the scanner.
Scan Type
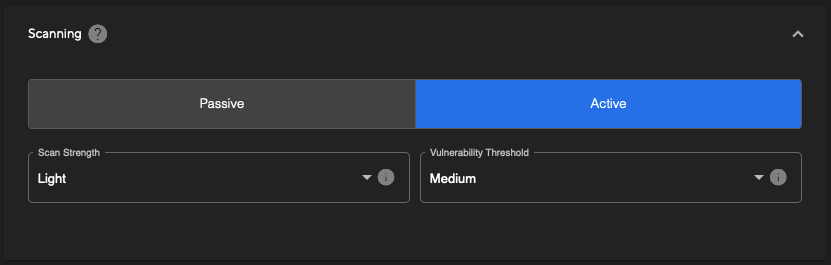
The final configuration section is the ‘Scanning’ options. Here you can see that there are two scanning types:
- Passive: Passive scanning will only spider the target and perform analysis on the pages and URLs identified. This is a much faster process but will not identify as many vulnerabilities as an active scan.
- Active: Active scanning will send a large amount of traffic to the target to check for more in-depth vulnerabilities. This is a slow process and can significantly increase the time taken to complete a scan.
If you are running a scan for the first time it is recommended to use Passive scanning to get an understanding of the target’s attack surface and how the scan may affect the target before running an Active scan.
When selecting an Active scan there are two additional options that can be adjusted to configure the following:
- Scan Strength: Choose between Light, Medium, High, and Heavy to tweak the aggressiveness, and thus speed, of the scan. The default is set to ‘Light’ to ensure that there is as minimal of an impact to the target’s web services as possible. We recommend adjusting this only after performing an initial scan and gauging the resource impact upon your application(s).
- Vulnerability Threshold: Choose between Low, Medium, and High thresholds to adjust the level of potential false positives that are reported as a result of the scan. A ‘Low’ selection will allow for more potential false positives to be reported, where the scanner is not fully confident of the vulnerability being present, whilst a ‘High’ threshold will ensure that any potential false positives are not reported. The default ‘Medium’ option will strike a balance between these two.
Scheduling
Finally, you can then set the recurring schedule as desired.
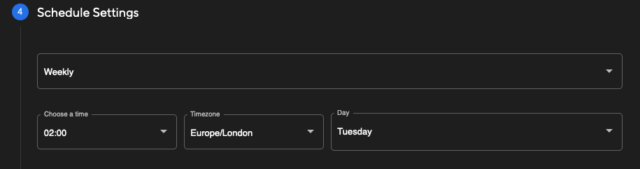 Choosing Weekly will allow you to select the day of the week to re-run the scan, whilst Monthly will allow you to set a date during the month to run the scan on a monthly interval. The time zone can be selected to adjust to your local time as needed.
How the Scanner Works
If you’re a little technically inclined and want to know more about how our setup works, or you’d like some reassurances of how we’re handling data, let us walk through a bit of how the scanners work on the back-end.
Once a scan is setup, each of the relevant configuration items (schedule, port selection, target selection, etc.) are all stored in a query-able format. This is so the Offensive Operations Center scheduling ‘orchestrator’ can quickly identify the next scan(s) to run for you and any of our customers.
When a scan’s scheduled start time is reached, the orchestrator aggregates all of the configured options and pushes these to the relevant automation. In this example, it will be the web application scanner. Some of this information includes additional details such as the organisation identifier, who created and last modified the scan, and so forth – this type of information is used to later attribute information to assets, services, URLs, and vulnerabilities (if identified!).
Crucially when a scan is started, and for the sake of this example let’s say there are five different scans from different organisations/users, this will create five new separate instances of the scanner. These five instances run completely independently of each other, and will provide separate individual output files that will be imported into the Offensive Operations Center later on. We take security very seriously here at CovertSwarm, and segmenting data is one basic piece of the puzzle.
With the scan now initialised there are several stages that the instance will run through:
- An initial ‘availability’ check will be performed to see if the application is reachable on the specified host. This checks each of the ports provided in the scan configuration from earlier in this blog post.
- If the application is reachable, the next stage is a basic web crawl (spidering) of the application. This collates all of the pages, paths, and links from the application recursively – up to the depth of the configuration settings provided.
- One point to note here is that links/paths found in each spidered page will be stored regardless of the depth. The Depth setting only limits the recursive nature of the web crawling.
- If AJAX spidering is enabled, this will then be performed alongside the basic web crawling to further enumerate the target application.
- The next stage is the Passive scan – this is always performed on the identified pages/files/paths regardless of whether ‘Active’ scanning is enabled or not as this purely analyses the cached data. There is no additional traffic sent to the application at this stage.
- If Active scanning is enabled, then this next step will be the main bulk of the scanning whereby each and every path identified during the spider crawling stage will be subjected to different checks to identify potential vulnerabilities.
- This stage will take the longest amount of time, which can vary depending upon the complexity of the application.
- Faster, more aggressive scan configurations could potentially impact the availability of the target application, which is why we have set the default aggressiveness to ‘Light’ and recommend an initial Passive scan before a full Active scan.
- Finally, the results are converted to our internal CovertSwarm ingest format and then sent off to another microservice to be imported.
Once a scan has completed, its next ‘trigger’ time will be updated as per the scheduled settings and the cycle will continue to ensure the cyber risk gap is minimised as much as possible.
What’s Next?
We’re always looking to innovate here at CovertSwarm. There are many new features being added to the roadmap and we’re always listening to our customers to hear ways in which we can provide a better user experience, simplify their workflows, or enrich the data we capture and process.
However, as a sneak-peak of some of the features we’re investigating specifically relating to the web application scanning:
- Authenticated application scanning
- Exclusion lists for files, paths, etc.
- Customisable scan profiles, e.g. to only scan for SQL injection, XSS, etc.

The attack your training prepared them for doesn’t exist
I’ve delivered more security awareness sessions than I can count. I’m also a social engineer, which means I’ve been the person those sessions are trying to…

The call nobody talks about
The attack call is the one that gets written up in the report. But in James Sheppard’s experience, it’s rarely the most important call he makes.

DORA Threat-Led Penetration Testing: What article 26 actually requires
Annual penetration testing does not satisfy DORA’s testing mandate. Here’s what Article 26 actually requires, who it applies to, and what a real TLPT exercise looks…