Exploiting Microsoft Windows 11 via Process No-Hollowing
An adapted technique to bypass Managed Detection and Response (MDR) and Endpoint Detection and Response (EDR) solutions.
An adapted technique to bypass Managed Detection and Response (MDR) and Endpoint Detection and Response (EDR) solutions.
In this article we will show how using the “Process No-Hollowing” technique can bypass the detection of modern MDR/EDR solutions, a method that CovertSwarm continually leverages to compromise our customers.
We will demonstrate an example that can be actively used to exploit Windows 11 machines running some of the latest ATP solutions including Microsoft Defender.
This technique and cyber-attack approach was fully disclosed and reported to Microsoft by CovertSwarm in February 2022, and their response was that “this cannot be considered a vulnerability as no security boundary is crossed.”
This article also serves as in introduction into the leveraging of common (and less common) Windows features to bypass different layers of protection that normally block attackers from executing “malicious” code, and that a threat actor may utilise as part of their malware design.
We will talk about WriteProcessMemory, a common API call used in several different situations including within legitimate programs, as well as basic process injection techniques that hide interesting and potentially unexpected behaviours that CovertSwarm believes deserve to be explored and highlighted to the cyber community.
Before we start it would be helpful to take a few steps back in order to describe the details of our attack starting point – the well-known process injection technique: “Process Hollowing”.
To frame this let us begin by reminding ourselves of “process injection”.
Process injection (PI) is a widely used tactic for systems security evasion that continuously changes in its forms and approaches. This is due to the techniques upon which it relies needing to adapt as systems are continuously developed to improve their defences over time. The deep and plentiful world of Windows’ internals offers the necessary instruments and tooling for hackers (ethical or otherwise) to engage in and adapt PI attacks to successfully cater for numerous situations.
CovertSwarm’s research has uncovered how the usage of certain Windows objects and underlying APIs often provide the key to success in evading security measures put in place that include EDR, AV, MDR, and XDR solutions.
TL; DR. You can skip the following section if you already understand the Process Hollowing technique and what is happening during the injection phase.
The process hollowing technique (T1055.012 in the MITRE ATT&CK Framework) consists of using a legitimate target process as the container to deliver unintended malicious shellcode.
Its goal is not to trigger the shellcode’s execution remotely but instead to modify specific regions of memory so that the program flow of the target process will point to the shellcode by itself – resulting in the execution of the malicious content rather than the usual, legitimate instructions.
The key steps of T1055.012 are the following:
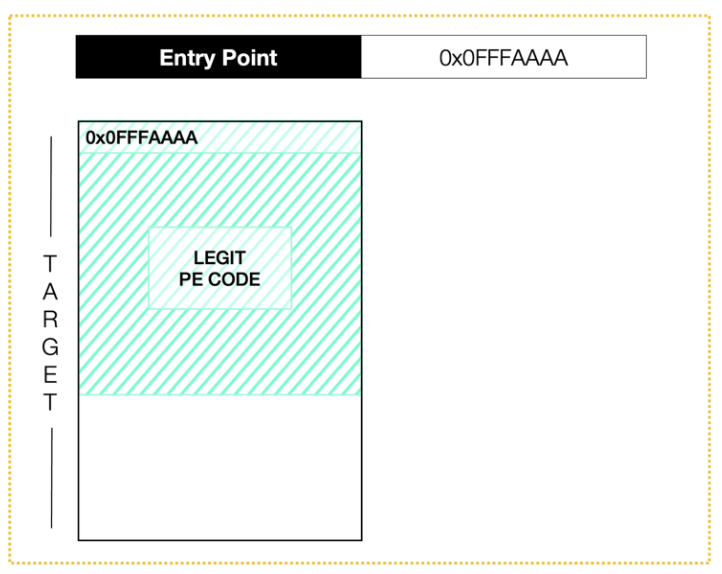
Figure 1 – The PE code of the target process starts at the address 0x0FFFAAAA and the EntryPoint points to it.
The targeting of a suspended process is required to control when the new EntryPoint is hit.
A Windows process can be considered suspended if all its threads are suspended. Since suspending all the threads of a target process is unusual/unlikely and almost impossible as it leads the process to crash most of the time. Therefore, the best way to approach this technique is by creating a new process but initially in a suspended mode.
A new suspended process has a single thread which can be easily handled to control the parent itself.
The original EntryPoint is stored in the _CONTEXT structure of the thread which contains several pieces of information about the register’s value; exceptions; errors; and so on.
In particular, the address of the EntryPoint is loaded as the value of the Context->EAX pointer, and it should point to the PE code section address when the PE is executed.
The attack plan is to aim to overwrite that value making the execution point to where we need it to occur.
Before doing so we need to perform several further actions to prepare the target for the injection.
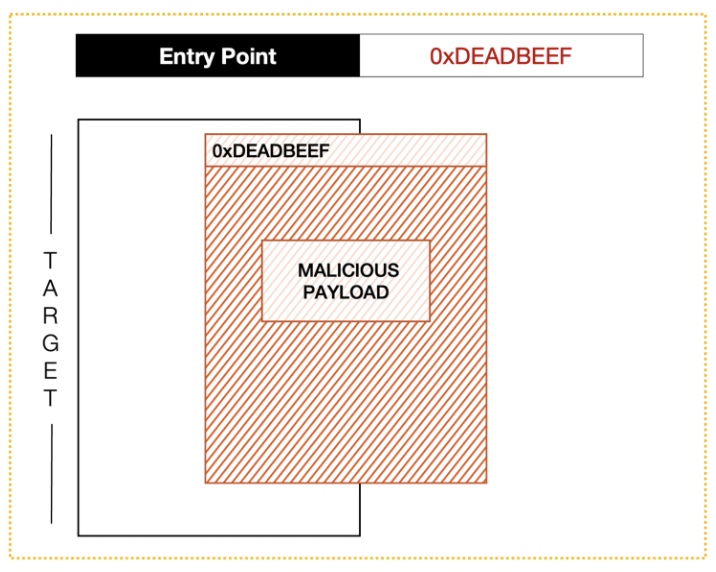
Figure 2 – The malicious payload is written to the remote process at the address 0xDEADBEEF and we overwrote the EntryPoint making it points to the shellcode.
After having retrieved the image base address from the target process, we can invoke NtUnmapViewOfSection to unmap the memory region at that base address, “hollowing out” the core of the PE image.
Then, by using VirtualAllocEX, we allocate a memory space large enough to contain our shellcode, and we then obtain its memory address as the output of the function call.
The allocation requires PAGE_EXECUTE_READWRITE protection since we need it to be as open as possible.
The region address is used as a parameter in the WriteProcessMemory code for defining where the shellcode will be written.
The last required step is to overwrite the EAX value in the context of the targeted thread (by using SetThreadContext) and then resume it (ResumeThread) which leads to the execution of the instructions at the address of the new entry point.
As already mentioned, by controlling the only thread of a singular process we can control the process itself, which means that by resuming the thread we resume the execution of the whole process.
Process hollowing is a known and documented technique, but some of the Windows APIs required to deliver this method of attack/exploit are typically actively monitored by MDR/EDR solutions which kill the process in case one of those is used.
The “noisiest” attacker actions that can be delivered include SetThreadContext, VirtualAllocEx and setting the PAGE_EXECUTE_READWRITE protection on the new memory section.
The concept behind CovertSwarm’s exploit and workaround is based upon us recycling the existing memory sections in the target process.
We have found that we can avoid using VirtualAllocEx and the allocation of a new PAGE_EXECUTE_READWRITE space in memory by writing the shellcode into very specific locations that already exist in the target – which then allow us to execute malicious code.
Our research has uncovered dozens of such locations.
Although in theory these findings mean we have found a solution for the traditional allocation problem, SetThreadContext still needs to be called and that renders our initial solution ineffective – so we needed to try something new and different in order to find a memory space where the shellcode could be executed/triggered, or where the program flow would naturally and autonomously jump to.
Upon further exploration, again, we found several locations that satisfied this requirement and that were proven to work effectively to deliver an exploit in different situations.
Using these discoveries in combination we moved on to target an address that we knew would be hit every time execution starts, and a target that exists in every Windows process: the address PE code section (the original address of entry point), which you will recall is the memory region that contains the main code of the process itself.
Overwriting this made the injection flow easier since the shellcode would be executed just after the ResumeThread function call, without having to find methods by which to trigger it.
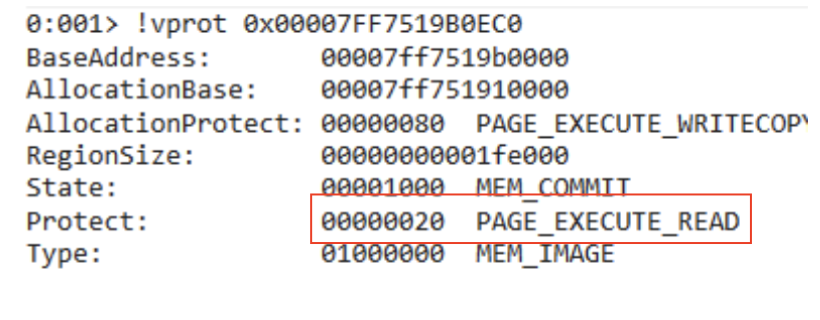
Figure 3 – .TEXT memory protection is set to PAGE_EXECUTE_READ by default
However, yet again there was a new challenge to overcome – the executable memory page of the process we were trying to hijack was protected by MS Windows and is by default read only.
In the example screenshot above, WinDbg shows that the PE code section (starting at address 0x00007FF7519B0EC0) has PAGE_EXECUTE_READ protection set, which means that we only permitted to execute instructions or read out from it. To achieve our goal, we needed to find a way to set our target page to be writable and to be able to change the protection back to its default value once we have written the shellcode into the memory.
This could only be performed if we gained sufficient privileges assigned to the process.
Achieving this level of access is not technically difficult, and so we now move on to describe an optimized solution/workaround for this issue.
As described in an official Microsoft blog post (https://devblogs.microsoft.com/oldnewthing/20181206-00/?p=100415) Microsoft acknowledges that WriteProcessMemory has administrative superpowers.
When using WriteProcessMemory to write to Read-only memory addresses we have observed that associated errors and exceptions are not raised within the OS if we have sufficient privileges on the target process. The question is, why?
After reaching out to Microsoft, we have been provided with a valid – but, we feel, contestable -reason for this unexpected behaviour – that debuggers manipulate all/any sections of a process and so are provided with the ability to inject instructions for debugging purposes without having to change and reset the memory protection every time.
Microsoft has implemented a routine in the WriteProcessMemory execution call that system checked our privileges on the target, and once found to be elevated highly enough, set the memory protection to PAGE_EXECUTE_READWRITE. In simple terms, we discovered that if we had high enough privileges to set a different protection value to the target memory, WriteProcessMemory will do the job for us.
So, we asked ourselves, how can we leverage this behaviour in our injector?
The minimum access rights required for triggering the feature are PROCESS_VM_WRITE and PROCESS_VM_OPERATIONS, and opening a process handle with those privileges is not difficult at all, since we created the target suspended process, we also have all the privileges on it.
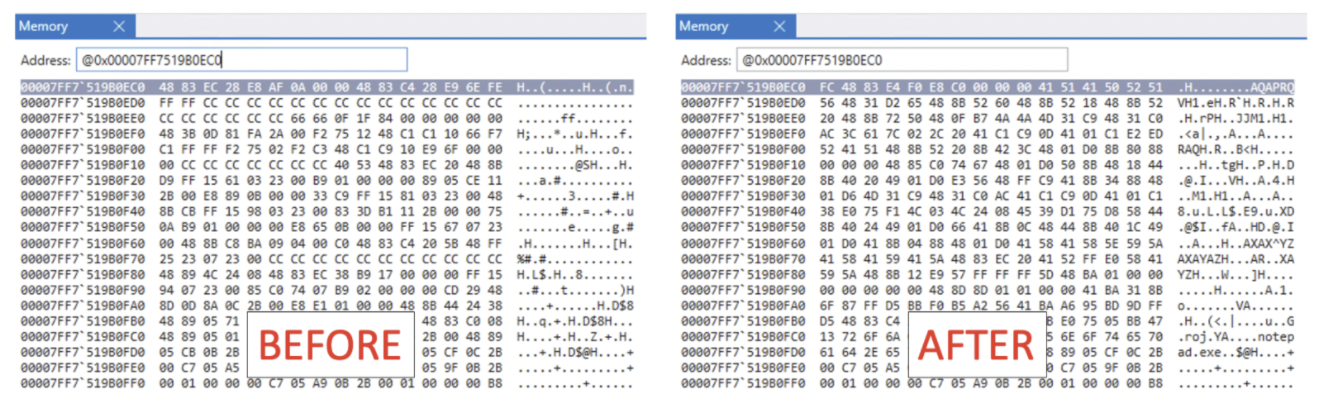
Figure 4 – The .TEXT section successfully overwritten after WriteProcessMemory call.
As expected, we invoked WriteProcessMemory, specifying 0x00007FF7519B0EC0 as target address (address of entry point in our example), and successfully changed the read-only region.
Since our exchanges with Microsoft have so far indicated that they are not currently planning to mitigate the issue we have discovered, we are dedicating separate Swarm research to finding a working solution to counter the Process No-Hollowing technique.
We plan to present the resulting research in a future blog post which will focus on how to analyse the threat and risks from a Blue Team perspective, tracking actions and events raised.
Detecting the technique by monitoring and parsing ETW (Event Tracing for Windows) is currently the only way that we can think of to prevent it from being used and therefore it is important for our team here at CovertSwarm to spend time on Malware analysis and keep track on any change applied to them.
We note that most of the MDR/EDR solutions include an ETW integration which makes the detection and response possible, as long as an attacker does not additionally evade ETW itself.
If any reader has recommendation or insights here – please get in touch.
We named this modified technique “Process No-hollowing” as we completely remove the “hollow out” step from the original method. You can effectively consider it as an injector based on the Process Hollowing but that does not unmap (or remove) any memory region from the target process. At the end, it is nothing more than an effective example of how Microsoft Windows’ behaviour and its APIs, whilst implemented for legitimate purposes, can help an attacker to bypass EDR/MDR detection and create new and novel ways to store and execute their own nefarious shellcode.
We have chosen not to provide the full source code of the injector at this time for ethical reasons – acknowledging how this information could be employed by genuine bad actors, especially with no current ‘fix’.
The following Proof of Concept videos show our research’s impact against Microsoft Defender (running on Windows 11), as well as Kaspersky Total Security in successfully executing Msfvenom payloads.
Figure 5 – Executing Meterpreter and an MSF reverse shell in a fully updated Windows 11 (protected by Windows Defender).
Figure 6 – The same technique defeating Kaspersky Total Security on Windows 10.